Tuesday, November 4, 2014

Command line mail with Gmail SMTP on Mac OSX 10.10 Yosemite


I have been looking for a way to setup a command line mail (or mailx) working on OSX 10.10 (Yosemite) and I found a good blog posting by Anuj Gakhar for OSX Lion.  I elaborated a little bit more by Google search and found a quick fix for OSX Yosemite in http://stackoverflow.com/questions/26447316/mac-os-x-10-10-yosemite-postfix-sasl-authentication-failed.  I have added new information for OSX Yosemite.

This method is especially useful when you do not setup mail host on your Mac.

Here are the steps I followed.
  1. Configure Postfix for SMTP.

  1. Edit file /etc/postfix/main.cf
>> sudo vim /etc/postfix/main.cf

  1. Add in the following below the commented out relayhosts. relayhost can be any SMTP mail service such as [smtp.gmail.com]:587, [smtp.live.com]:587, etc.

relayhost = [smtp.gmail.com]:587
smtp_sasl_auth_enable = yes
smtp_sasl_password_maps = hash:/etc/postfix/sasl_passwd
smtp_sasl_security_options = noanonymous
smtp_use_tls = yes

  1. Add below line at the bottom if you are using OSX 10.10 Yosemite
smtp_sasl_mechanism_filter = plain

  1. Generate sasl_password if not already exists

>> sudo vi /etc/postfix/sasl_passwd

  1. Enter in the following (gmail or other SMTP setup used in 1.a. relayhost):
[smtp.gmail.com]:587 yourusername@gmail.com:yourpassword
  1. Run the following commands

>> sudo chmod 600 /etc/postfix/sasl_passwd
>> sudo postmap /etc/postfix/sasl_passwd
>> sudo launchctl stop org.postfix.master
>> sudo launchctl start org.postfix.master

  1. All set!  Let’s test.

Now, you should be able to send emails from within the command line.

>> date | mailx -s “date test” email@address.to
            
           email@address.to should have received an email from yourusername@gmail.com with subject "date test".

Sunday, June 8, 2014

Yard trimmer (Homelite Mighty Lite 26e) fuel filter replacement

My trimmer

I bought this small yard trimmer back in 2007 (9 years old!).  This Homelite Mighty Lite 26e trimmer had one issue about 3 years ago.  Rubber fuel tube got cracks so I replaced them.  This time, my trimmer had another issue. It became very difficult to start, and the engine stops right after.  When I tested it without the fuel filter in the fuel tank, it stayed a little longer.  My gut feeling about the main problem was the fuel intake part.

Figure 1. Homelite Mighty Lite 26e yard trimmer (I am holding the old fuel filter)


Buying parts

I went to the nearby Homedepot but it seemed like they no longer carry Homelite products.  My local store did not have the filter itself. Instead, I finally found Ryobi's part with ~$8.  It contains Fuel tube with the filter and the metal string to install. Part from different manufacturer may not fit, but I did not have much choice.

Figure 2. Ryobi's Fuel System Tune-up Kit from Homedepot.

Installation

I took out the old filter and the tube (See figure 4). Since the new filter came with the tightly attached tube, I had to replace them all together.

Figure 3. Old clogged fuel filter (upper) and the new filter (lower)


Figure 4. Taking out the old filter and the tube. 

From the outside to inside the tank, run the metal string through the hole.  Tightly attach the new tube and carefully pull it until you can hold the tube outside the tank.

Figure 5. Installing the new fuel tube using the metal string. 

Once you see a tiny bit of the new tube from outside of the tank, carefully grab it using long nose and slowly pull it to make it fully through the hole. 

Adjust the length of the tube inside the fuel tank. Cut the rubber tube to match the length to the metal attaching tube (give about 1/2 inch more length for flexibility). 

Figure 7 shows the finished trimmer. I was able to start the trimmer and the engine was running in excellent condition.  

Figure 6.  Once you see the new tube from outside the tank, use long nose to pull it out. 

Figure 7. Finished!


Fixing friend's leaking kitchen faucet (Pfister Hanover GT529)


Problem

One day, I was invited for a dinner at my friend's house. I was surprised to see their kitchen faucet is as same model as mine, and theirs was leaking somewhere in the spray head. The model is Pfister's Hanover GT529-TMS.  My kitchen has different color, though.
http://s7d1.scene7.com/is/image/Pfister/gt529-tms-sq-c1?$ProductDetailLarge$
Figure 1. Pfister Hanover GT529-TMS Stainless (Photo courtesy http://www.pfisterfaucets.com)
She asked me to see if I could replace the faucet for her but I thought it would be a waste of money if it could be fixed.  So I promised to take a look some day.

Today was the day.  As before, the spray head was still leaking so I started to disassemble the spray head to see if it would be fixable.

 
Figure 2. Leaking kitchen faucet spray head (Pfister Hanover GT529 Stainless)

Disassemble

 I unscrewed the top part then the spray head came out.  Then I screwed out the bottom black plastic part very carefully not to scratch the plastic.  After a few snug rounds, bottom part finally removed.  I still had no idea where the leak is coming from.  I wanted to take a look at the inside of the spray head but it did not come out until I shake it hard.  It finally came out after a few shaking!
Figure 3. Removed spray head (left) and the inner assembly.

Finding Clues

When I temporary screw just this black part in the main water hose, I was able to see the leak in the upper black screw part.  I wish I had a picture of it!!  When I unscrew the upper part, as shown in Figure 4, there are a rubber rim and the other side (upper side) is the plastic.  As you can see in the picture, the rim had cracks and broken into many pieces.  The water was leaking right there!

Figure 4. Finally found where the leaking is happening!!!  (See the broken plastic rim in the zoom-in picture in the left (or upper)).


Fix

I have decided to use the WaterWeld that I have bought for my bathroom renovation project.  It is waterproof and water pressure resistance so it is a perfect tool for this project.  I have assembled the parts and used the WaterWeld putty to fill the gaps due to the cracks.  I used enough putty to tightly fill the gaps.  Then it was dried a little bit although it can be wet right away.  I just wanted to give some time to dry up to be able to work with water pressure.

Figure 5. WaterWeld was used to block the cracks.

Finally

After about an hour, I assembled the spray head back and the leak is fixed!!!
Figure 6. Water leak is fixed!!!

Epilogue
I was able to buy the spray head parts and it would have cost ~$48.  If this fix breaks I would just recommend to buy the part, but at this moment, the fix is satisfactory.  My friend has saved some $$.


Sunday, May 25, 2014

Installing WDTV in 2007 Honda Odyssey


Introduction

I have 2007 Honda Odyssey EX-L with built-in entertainment system, so called DVD player.  For a long time, I kept a book of DVDs in the vehicle and I had to change the media whenever my kids wants me to.  To summarize the disadvantages of carrying DVDs are:
1. Big and heavy
2. Have to keep it up to date so the kids are not bored.
3. Distracting and unsafe when they ask me to change while driving.
4. Scratches make DVD unplayable or skip.

So I have decided to upgrade my minivan with media player.  I have used WDTV for a few years at home.  The advantage of this media player is that it has two USB ports.  I can attach USB thumb drive(s) to work as attached drive.
Figure 1. WDTV media player and Velcro to attach in the vehicle.

Although portable HDD (2.5 inch) gives much more storage option for the price(1 TB or more), it has moving parts and cable connection.  I decided to use 128 GB USB thumb drive since it would be good enough size for the vehicle (SD quality (480p)).  It also has no moving parts so it should last longer than HDD especially in the moving vehicle.  FYI, I have paid about $45 in Spring 2014.
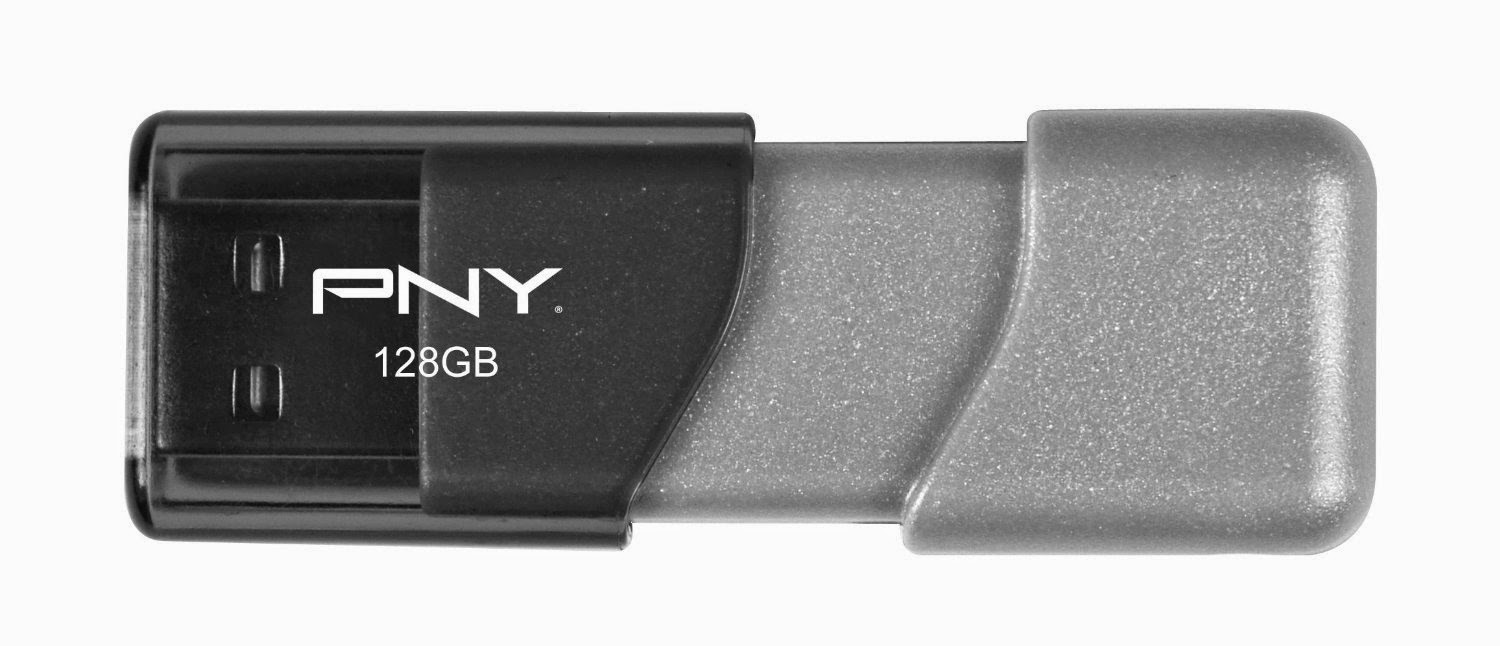
Figure 2. PNY 128 GB USB thumb drive.  (Courtesy amazon.com)
Another good thing about WDTV is that it is one of very few media players these days with RCA input ports.  Most of new models only come with HDMI port which does not fit in my old minivan.


What I have

WDTV requires 12V DC adapter for home use.  In the Honda Odyssey, there is a 12V DC power jack in the trunk so I can use it directly without using a power inverter.    I could use the power from the front but I thought it would be better to have AUX and power comes from the same wall or direction to make wiring easier.
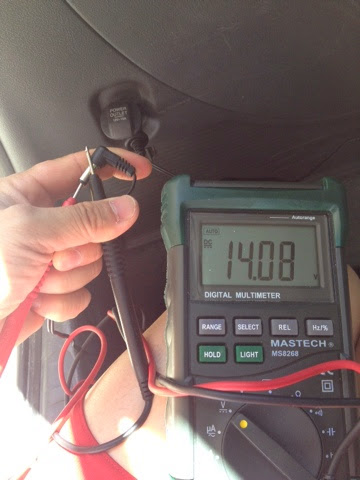
Figure 3. In  the trunk (driver side), there is a 12V DC power jack.
Also in the driver side rear seat, there is RCA input port taking Video, Left, and Right signals.
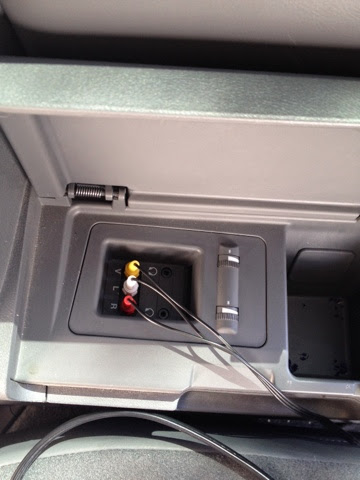
Figure 4. RCA jack located in the side globe box in the rear driver side seat.
Main difference between home and vehicle use of media player is the constant power to the device.  In home use, even though the user turns off the power of the device, the wall power still provides enough voltage to keep the metadata such as checking to see if the movie is previously viewed, if it had stopped in the middle, and so on.  So it can resume when the user turn the device back on.  In the vehicle, kids are annoyed if they have to watch the same first part of the movie whenever parents stops and restart the engine.  In order to prevent this issue, I took a 12V battery from my old home alarm system that I no longer use.
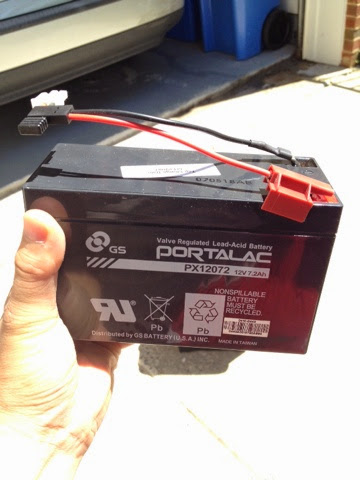
Figure 5. Small rechargeable 12V battery from old home alarm system.

At least two cables should be attached to the WDTV to play a video: 12V power and AV.  AV comes from RCA ports but I only had two 6 feet cables.
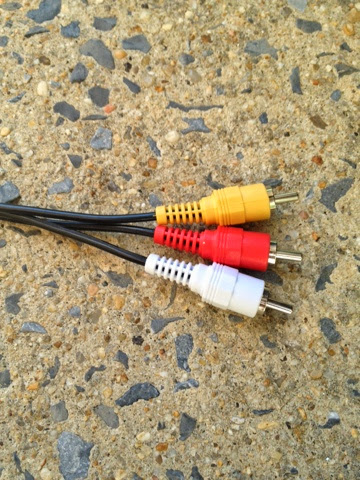

Figure 6. RCA cable that needs to be cut and soldered.

What I did

Firstly, I need to find a good spot to keep the WDTV device.  WDTV's remote does not allow wide angle so it has to be in the center of the vehicle as much as possible so people in any seat can use the remote without trouble.  I decided the location would be under the center console between the driver and passenger seat.

I had one RCA male-to-male connector so the AV port should be extended.  I cut one color on each cable and soldered carefully.
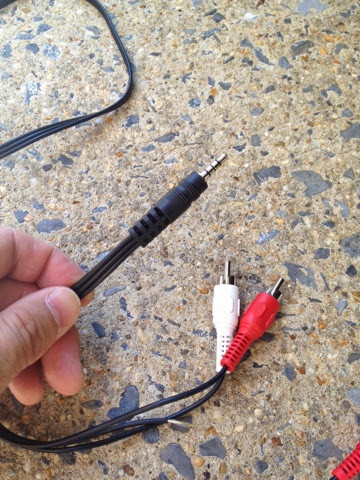
Figure 7. AV-RCA cable to be extended by soldering.
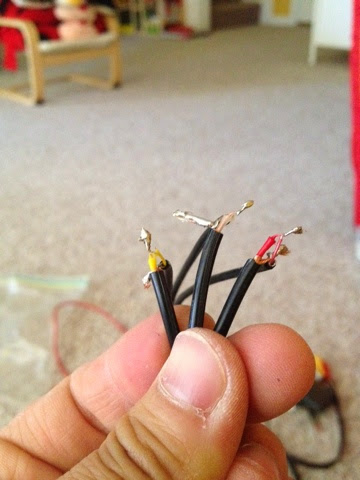
Figure 8. Soldered RCA cables.  This cable became >6 feet.

I took a connector from my broken electronics and soldered it to the battery so I can replace it without cutting the wire if I have to.
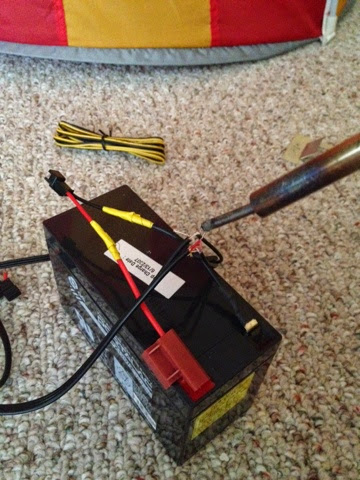
Figure 9. Battery connector is soldered.

Figure 10 shows the sketch of the installation.  The battery goes underneath the middle seat and WDTV will be installed under the center console.  When engine runs, 12V battery will be charged and the power to the WDTV will not stop even after stop the engine.  In the WDTV option, there is a power saving option to turn off the media after 3 hours of no action.  I turned it on but I still wish the duration can be adjusted.
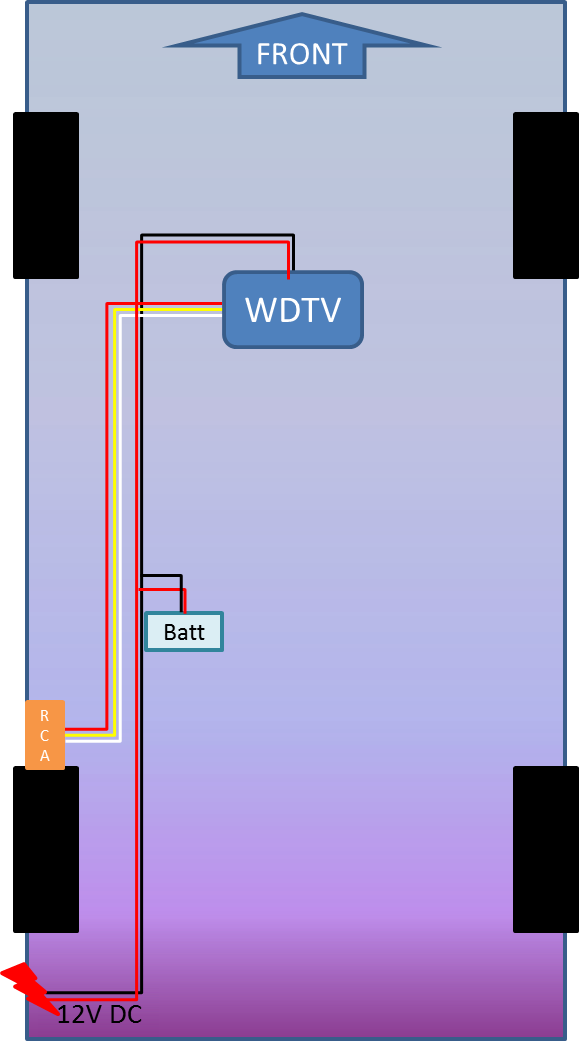
Figure 10. Schematic diagram of wiring.

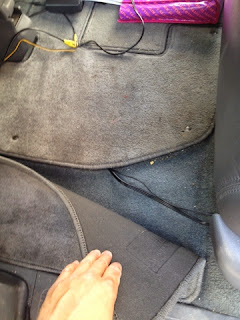
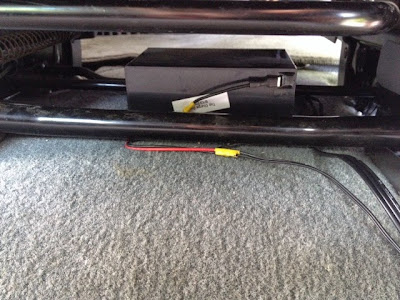
All the cables go underneath the carpet and the seats.  The battery is installed underneath the middle seat.  It is not only invisible but also protected by the direct Sun light when parked.
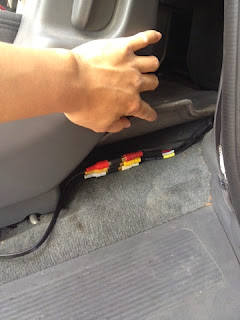
Figure 11. Cables underneath the carpet (middle seat)

Figure 12. Battery underneath the middle seat.  All the wires goes under the bars so it won't have issue when removing the middle seat.

Figure 14 shows the WDTV using Velcro.  There is another USB port in the back so the capacity can be extended in the future.  Also I can bring many USB memory sticks so I can carry hundreds, thousands of movies/TV shows in just a few thumbs drives.
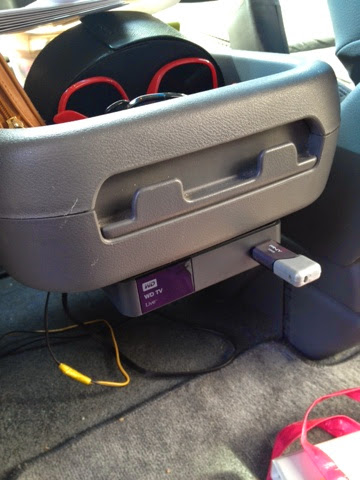

Figure 14. WDTV is attached under the console using the Velcro.    

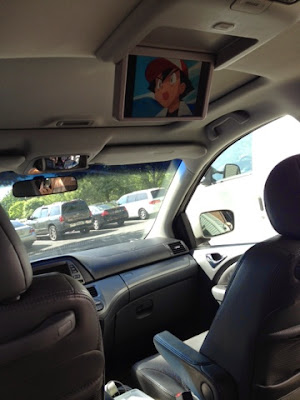
Figure 15. Kids are enjoying Pokemon video using WDTV.

Monday, January 6, 2014

Conclusion & Lessons Learned - Master Bathroom Renovation Project

Master Bathroom Renovation Project - Conclusion & Lessons Learned

SCHEDULE:
Actual starting date of this project was 10/25/2013 and officially finished (including cleaning) on 1/3/2014, which is 70 full days total. My original plan was to finish the project in 30 days. My working time was limited because I had to work on this project after work (~after 5 pm) , and most of the time during demolition and framing, I could not work late at night because of the noise to the neighbor. (This is what I don't like about townhomes.) Most of the day, I only able to work ~3 hours or so. If I divide 70 days into 3, I can say I might have finished this project in ~23 days if I worked full-time. Anyway, I have failed to plan all the time restrictions I actually had.


BUDGET:

I have spent ~$4000 for the all the parts + tools for this project. It can be divided into ~$3487 of parts, $129 of sales tax, and ~$428 of the tools. Detailed breakdown is shown below table (Table 1). I have originally paid $15 for the shipping of the glass blocks from Homedepot. But it was refunded when they gave me credit for the damaged blocks.


Table 1. Detailed spending table.

DECORATIONDISCOUNTFRAMINGPLUMBINGSHIPPINGTAXTILETOOLGrand Total
amazon.com$31.88
$887.44$569.36


$244.56$1,733.24
Home Depot$5.77-$76.33$441.86$85.63$0.00$116.59$1,245.29$181.21$2,000.02
Lowes
-$34.22$155.32

$12.41$174.61$1.97$310.09
Grand Total$37.65-$110.55$1,484.62$654.99$0.00$129.00$1,419.90$427.74$4,043.35

Below table (Table 2) summarizes the spending compared to the planned budget. I have spent 16% more (whole discount amounts are applied to the parts) on parts and 43% more on tools but saved 35% on the sales tax by using online orders such as amazon.com. Overall, I have spent 16% more which is acceptable (if not great) for me.

Table 2. Summary of actual spending compared with the original plans.
PlanActualPercentage
Parts$3,000$3,487116%
Tools$300$428143%
Tax$198$12965%
Overall$3,498$4,043116%


LESSONS LEARNED:

Project duration and budget planning looks like the main concern for almost everyone. But the quality of the outcome can sometimes be overlooked but the duration and budget is frequently affected by the final quality of workmanship. I had to redo some of the shower floor tiles and walls because it did not meet my expectation. I had to spend quite a time and effort to redo the work but if I did not spent time doing that, I might have encountered bigger problems at the next stage.

Amateur performance and workmanship can somewhat be overcome by better tools. If you do not know what tool to buy, ask the professionals and get tools what they use (if it is too much expensive, get one level below.). Do not buy cheap ones. It won't last long and you will end up spending more time and money to replace.

Spend lots of time to research. Before the first demolition day, I have spend lots of time (at least 3 months) to plan for the rough design and feasibility. I have searched and watched youtube and found one good guy (Thanks for the video, TilemasterGA!) with all the detailed instruction video.

Be careful about the scope creep. Scope creep is a term used in Project Management which means "uncontrolled changes or continuous growth in a project's scope". Try to focus on what you have planned. Try not to add more jobs as much as you can. For example, someone suggested me to add steps outside the tub. I was thinking about adding them but decided not to, because it will increase my budget and time to finish. I have to recalculate the number of tiles and materials for the frames and so on. My wife wanted to add the niche next to the sink. I accepted to add it and it cost me over $100 more in total and it impacted the project duration as well.
Fig 47. Mission accomplished!

REFERENCES:

TilemasterGA on youtube.com: All about the tricks and steps for the old bathroom demolition and the new tile installation.

Tiletools.com: Information about trowel size selection.

Autodesk Homestyler Floorplan design: Free online rough design of the floor plans.

Johnbridge.com: Shower floor deck mud calculator.

Tile estimator: Tile floor and wall planner.  Very nice tool to estimate number of tiles.  Estimated amount of thinset and grout is also calculated.  But you cannot save your creation.  Don't forget to print out.

Pittsburgh Corning: Glass block installation

Google Sketchup: Very detail 3D design tool.

Thursday, January 2, 2014

Glass blocks & shower door - Master Bathroom Renovation Project

Master Bathroom Renovation Project - Glass blocks & shower door

GLASS BLOCKS:
Now it is time to finalize the shower back wall - Glass blocks. Pittsburgh Corning web site provides the instruction for four different glass block installation methods.  Since I have decided to use ProVantage II method, I bought spacers for the Thinline blocks and the wall brackets.  I realized that they do not have brackets for the Thinline blocks so I had to cut the side of spacers to use with the regular-sized (for 4-inch thick blocks) brackets (Fig 41).

Because the side walls for the glass blocks are tiles, I had to drill the holes at each side of the bracket, total 14 holes.  I have used regular drill bit for the bricks, but it did not last long.  It became dull after drilling 5 holes.  So I bought better ones as in Fig 42.  These worked great and did the job much faster.  

I have used the special adhesive for the glass block (Pittsburgh Corning Glass Block Sealant from Homedepot) as recommended in the instruction.  Due to poor precision of the hole location on either side, the grout lines should be carefully inspected before the sealant dries.  After one day, the glass blocks became very sturdy.

Fig 41. Spacer for Thinline does not match with the regular-sized metal bracket.
Fig 42. Bosch glass and tile drill bit set from Homedepot (Courtesy homedepot.com).

 I have installed 7 rows of glass blocks in a few hours.  The most time consuming job was to drill the holes at each row.  Installation using the sealant was clean and easy.  I personally think it is as good as the traditional mortar method for my indoor application.  I let it dry for about 24 hours and worked on the grout.  I used white grout that is designed exclusively for the glass blocks (Pittsburgh Corning ProVantage 15 lb. Grout Mix).  My local Homedepot did not carry this item so I have to drive about an hour to Fairfax, VA to pick it up.  After the grout is dried, I applied the sealer because the spec said Mold/mildew resistant: NO, Stain resistant: NO.  Figures 43 and 44 shows some pictures during the Glass block installation.


 Fig 43. Glass block installation. 
Fig 44. Picture showing after putting the glass block grout.


SHOWER DOOR:

Frameless shower door that I used is 3/8 inch thick tempered glass manufactured by Dreamline (DreamLine SHDR-61487610-07 Frameless Sliding Shower Door 44-48 by 76 Chear 3/8 Glass Door: Brushed stainless steel).  I purchased it from Amazon.com.  One thing you have to keep in mind is that the price at amazon goes up and down very frequently.  So you have to be careful not to buy this item when it is too expensive. I recommend you check the price change even after you place an order.  If it drops, call or chat with them to get price adjustment.

My shower width is 46 inch so I had to cut the rail pipe by 2 inches.  Since I do not have blade for the metal cutting, I used hand tool to cut it.  It takes time but it is doable.  Sliding door is more expensive than the regular swing door.  The sliding door works better in my situation because of the location of the sink.  The particular sliding door I bought had 4 inches of wiggle room (between 44 and 48 inch width).  But if you want to use swing door, the width can only be adjusted within 1 inch.  

The glass door is very heavy.  Moving or installing the glass door requires at least 2 people.  Instruction was straightforward so I did not have any trouble installing.  Vertical and horizontal level is the most important factor at this moment.  Spend more time to make sure the levels at different surfaces.  Figure 45 and 46 shows the pictures of the bathroom after clean up.


Fig 45. Upper: before renovation.  Lower: The new shower with the frameless door.

Fig 46. Panorama picture of the finalized master bath after clean-up.