Wednesday, March 23, 2016

How to Bridge FiOS Actiontec MI424-WR router to use your own router as primary

How to bridge FiOS Actiontec router

If you are using Verizon FiOS and using other personal router for your home network, you might want to consider using only one router to simplify your setting and to be able to connect your home network from outside (via VPN).  The routers these days provide faster and more stable connection and also provide VPN capability with better security.

I was looking for an instruction and found quite a few.  I found this is the best but it does not have images so I tried to add screenshot based on this instruction.  I have configured three of FiOS network for my friends so this is verified method.


FOLLOW THESE STEPS:

  • (1) Connect to your MI424-WR.  Default IP, ID, and PW is written on the back of your router.  For me, it is 192.168.1.1
  • (2) The default username and password for the MI424-WR is "admin" and written on the back of the router.  However, if you changed your password and forgot your password, push the reset button on the back with the pencil or paperclip for over 15 sec and release it.  The router will reset to its original setup. 
  • (3) OPTIONAL: Once you are logged in, go ahead and reset the router to the default settings if you have customized your router in the past, otherwise skip this step. To reset the config to defaults, click on "Advanced" at the top, then click yes in the confirmation box. You will then see "Restore Defaults" at the lower left side of the screen. The router will now reboot itself.
 

  • (4) Log back into the router if you have "Restore Defaults", otherwise just click on "My Network" at the top of the screen. Once you are there, click on "Network Connections" at the menu on the left.
  • (5) IMPORTANT: you will need to release your MI424-WR's IP.  To do this, click on the "Broadband Connection (Coax)" from the connection list. Then click on the "Settings" button at the bottom.
  • (6) You will now see a bunch of settings for this interface. Do not change anything except for this.  You can click on the "Release" button if an IP address is currently assigned to the MI424-WR. If your router doesn’t have IP assigned, you will not see this button.  If you don’t see this, just ignore and move on.  Click the "Release" button and immediately change the "Internet Protocol" option from "Obtain an IP Address Automatically" to "No IP Address". Click on "Apply" afterwards, then "Yes" (if there's a confirmation message), then "Apply" again.


  • (7) Turning the MI424-WR into a bridge: Now you are back to “Network Connections” page.  In the connection list, click on "Network (Home/Office)", then click on the "Settings" button. You will see a list of interfaces under "Bridge". Check the box next to the "Broadband Connection (Coax)", then check the box under the STP column. Click on "Apply" afterwards, then "Yes" (if there's a confirmation message), then "Apply" again.

 
  • (8) Since the MI424-WR will no longer be used for routing, go ahead and disable its wireless interface also. Click on "Wireless Access Point" in the interface list and then click on "Disable". You can also disable this in the "Wireless Settings" section.
  • (9) Just in case the MI424-WR will do something wacky, I disabled the built-in firewall also. Click on "Firewall Settings" and then select "Minimum", then click on "Apply".
  • (10) VERIFICATION: Verify that the MI424-WR no longer has a connection to the internet by looking at the status information in "Main". The MI424-WR should still have a connection to the ONT. You can check this by going back into "My Network", then "Network Connections", then clicking on the "Full Status" button at the bottom of the list. "Broadband Connection (Coax)". Should say it's connected still.
  • (11) Next, disconnect all ethernet cable from the MI424-WR. Power cycle both routers.  Then connect the Ethernet cable from any LAN port (MI424-WR) to WAN of your internal router.  Setup the router of your choice (for me, I'm using Asus AC-N66U). Make sure your new router's IP address is something different from 192.168.1.1 or it will conflict! Your new router should now DHCP an IP from verizon without any problems.  


The only way to access the MI424-WR after this setup is to directly connect a computer to it (via ethernet) and using a static 192.168.1.* IP address. It will no longer DHCP an IP to you. You will also notice that the "Internet" light (may look like a map globe) on the router will now be lit orange or turned off.. This is normal. The MI424-WR control panel will also perpetually say you're not connected to the internet. That too is normal.  Now my internal router has WAN IP directly from Verizon.

Monday, January 26, 2015

Fixing snapped ski pole (Leki Ventrix) using FiberFix

My ski poles

I bought this ski poles (Leki Ventrix size 115 cm (46 in)) about 12 years ago (2003?) when I was in Boulder, CO.  I really loved the grip and feeling of this poles while pole planting when skiing.


Accident happened

Last weekend, when my family went skiing, I accidentally stepped on one of my poles while holding my daughter.  It snapped!  My heart was broken since I knew this model is discontinued a long time ago.

Looking for replacement

I started looking for the replacement but since I did not pay attention the ski market for a long time, I did not know which one has better rating than Ventrix.  I liked the Trigger system of Leki so I wanted to stay with Leki.  There are Leki Carbon 11S which is out of stock in all markets out there.  Alternatively there is Leki Carbon 14S which is a little bit thicker diameter.  I wasn't sure if I would like it or nor.  The price at the local store was $149.

Looking for ways to fix it

When I was googling, I found this youtube video showing how to fix Carbon fishing rod. http://youtu.be/gCY8tLHyeJQ  I was almost sure there is a similar item in the US market.

Not surprisingly, amazon.com has everything.  I found similar item but a little bit easier to apply.  It comes with three different widths, 1, 2, 4-inch.  I bought 2 inch width and it is delivered today.

Preparation

First thing first, I did was to secure aligning the snapped pole.  In my toolbox, I found a wooden piece left from one of my furniture.  I used epoxy (WaterWeld) to securely attached inbetween snapped area.  It somewhat helps not to bent while drying.


FiberFix it!

The rubber gloves are coming with the FiberFix. It says it is non-toxic but the resin is extremely sticky.  I only used it about 12 cm length. 


After soaking it as indicated in the user's manual, I started to wrap it around the damaged area.  Using the rubber gloves, I wrapped it as tight as I could.  Then I used the rubber tape (non sticky) that came with the package.  As I tightly wrap it around the FiberFix, I was able to see the bubble and excess water comes out of the edge of the tape.  It helps securely fasten each other.

Wait time

 I waited about 30 minutes to let it dry, then unwrapped the rubber tape.  It looks and feels very hard now.  Using the sand paper came with the package, I sanded a little bit to make the surface smoother.

Final touch and evaluation

I used to wrapped electric tape at the bottom of the carbon area so it won't scratch much from ski edges.  I was worried about adding more weight due to this fixing material.  After complete, The weight difference before and after was ~3 grams.  I don't think I can feel 3 additional grams while skiing. Not too bad!  But I still have to check if the elastic feelings are similar. 


Tis picture shows the final appearance.  The fixed one looks a little bit thicker near the snapped area but hopefully I don't feel much difference while skiing.


Tuesday, November 4, 2014

Command line mail with Gmail SMTP on Mac OSX 10.10 Yosemite


I have been looking for a way to setup a command line mail (or mailx) working on OSX 10.10 (Yosemite) and I found a good blog posting by Anuj Gakhar for OSX Lion.  I elaborated a little bit more by Google search and found a quick fix for OSX Yosemite in http://stackoverflow.com/questions/26447316/mac-os-x-10-10-yosemite-postfix-sasl-authentication-failed.  I have added new information for OSX Yosemite.
This method is especially useful when you do not setup mail host on your Mac.

Here are the steps I followed.
  1. Configure Postfix for SMTP.

  1. Edit file /etc/postfix/main.cf
>> sudo vim /etc/postfix/main.cf

  1. Add in the following below the commented out relayhosts. relayhost can be any SMTP mail service such as [smtp.gmail.com]:587, [smtp.live.com]:587, etc.

relayhost = [smtp.gmail.com]:587
smtp_sasl_auth_enable = yes
smtp_sasl_password_maps = hash:/etc/postfix/sasl_passwd
smtp_sasl_security_options = noanonymous
smtp_use_tls = yes

  1. Add below line at the bottom if you are using OSX 10.10 Yosemite
smtp_sasl_mechanism_filter = plain

  1. Generate sasl_password if not already exists

>> sudo vi /etc/postfix/sasl_passwd

  1. Enter in the following (gmail or other SMTP setup used in 1.a. relayhost):
[smtp.gmail.com]:587 yourusername@gmail.com:yourpassword
  1. Run the following commands

>> sudo chmod 600 /etc/postfix/sasl_passwd
>> sudo postmap /etc/postfix/sasl_passwd
>> sudo launchctl stop org.postfix.master
>> sudo launchctl start org.postfix.master

  1. All set!  Let’s test.

Now, you should be able to send emails from within the command line.

>> date | mailx -s “date test” email@address.to
            
           email@address.to should have received an email from yourusername@gmail.com with subject "date test".

Sunday, June 8, 2014

Yard trimmer (Homelite Mighty Lite 26e) fuel filter replacement

My trimmer

I bought this small yard trimmer back in 2007 (9 years old!).  This Homelite Mighty Lite 26e trimmer had one issue about 3 years ago.  Rubber fuel tube got cracks so I replaced them.  This time, my trimmer had another issue. It became very difficult to start, and the engine stops right after.  When I tested it without the fuel filter in the fuel tank, it stayed a little longer.  My gut feeling about the main problem was the fuel intake part.

Figure 1. Homelite Mighty Lite 26e yard trimmer (I am holding the old fuel filter)


Buying parts

I went to the nearby Homedepot but it seemed like they no longer carry Homelite products.  My local store did not have the filter itself. Instead, I finally found Ryobi's part with ~$8.  It contains Fuel tube with the filter and the metal string to install. Part from different manufacturer may not fit, but I did not have much choice.

Figure 2. Ryobi's Fuel System Tune-up Kit from Homedepot.

Installation

I took out the old filter and the tube (See figure 4). Since the new filter came with the tightly attached tube, I had to replace them all together.

Figure 3. Old clogged fuel filter (upper) and the new filter (lower)


Figure 4. Taking out the old filter and the tube. 

From the outside to inside the tank, run the metal string through the hole.  Tightly attach the new tube and carefully pull it until you can hold the tube outside the tank.

Figure 5. Installing the new fuel tube using the metal string. 

Once you see a tiny bit of the new tube from outside of the tank, carefully grab it using long nose and slowly pull it to make it fully through the hole. 

Adjust the length of the tube inside the fuel tank. Cut the rubber tube to match the length to the metal attaching tube (give about 1/2 inch more length for flexibility). 

Figure 7 shows the finished trimmer. I was able to start the trimmer and the engine was running in excellent condition.  
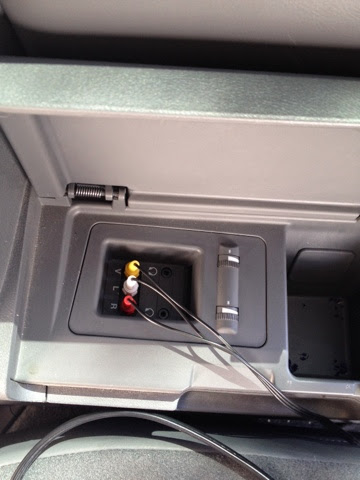
Figure 6.  Once you see the new tube from outside the tank, use long nose to pull it out. 
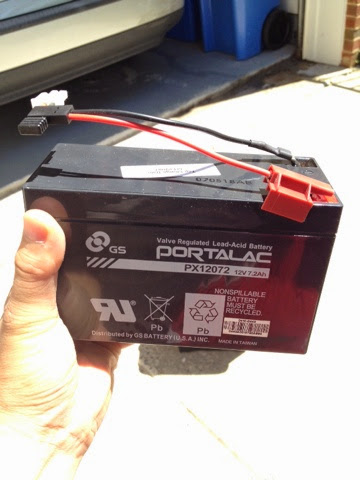
Figure 7. Finished!


Fixing friend's leaking kitchen faucet (Pfister Hanover GT529)


Problem

One day, I was invited for a dinner at my friend's house. I was surprised to see their kitchen faucet is as same model as mine, and theirs was leaking somewhere in the spray head. The model is Pfister's Hanover GT529-TMS.  My kitchen has different color, though.
http://s7d1.scene7.com/is/image/Pfister/gt529-tms-sq-c1?$ProductDetailLarge$
Figure 1. Pfister Hanover GT529-TMS Stainless (Photo courtesy http://www.pfisterfaucets.com)
She asked me to see if I could replace the faucet for her but I thought it would be a waste of money if it could be fixed.  So I promised to take a look some day.

Today was the day.  As before, the spray head was still leaking so I started to disassemble the spray head to see if it would be fixable.

 
Figure 2. Leaking kitchen faucet spray head (Pfister Hanover GT529 Stainless)

Disassemble

 I unscrewed the top part then the spray head came out.  Then I screwed out the bottom black plastic part very carefully not to scratch the plastic.  After a few snug rounds, bottom part finally removed.  I still had no idea where the leak is coming from.  I wanted to take a look at the inside of the spray head but it did not come out until I shake it hard.  It finally came out after a few shaking!
Figure 3. Removed spray head (left) and the inner assembly.

Finding Clues

When I temporary screw just this black part in the main water hose, I was able to see the leak in the upper black screw part.  I wish I had a picture of it!!  When I unscrew the upper part, as shown in Figure 4, there are a rubber rim and the other side (upper side) is the plastic.  As you can see in the picture, the rim had cracks and broken into many pieces.  The water was leaking right there!

Figure 4. Finally found where the leaking is happening!!!  (See the broken plastic rim in the zoom-in picture in the left (or upper)).


Fix

I have decided to use the WaterWeld that I have bought for my bathroom renovation project.  It is waterproof and water pressure resistance so it is a perfect tool for this project.  I have assembled the parts and used the WaterWeld putty to fill the gaps due to the cracks.  I used enough putty to tightly fill the gaps.  Then it was dried a little bit although it can be wet right away.  I just wanted to give some time to dry up to be able to work with water pressure.

Figure 5. WaterWeld was used to block the cracks.

Finally

After about an hour, I assembled the spray head back and the leak is fixed!!!
Figure 6. Water leak is fixed!!!

Epilogue
I was able to buy the spray head parts and it would have cost ~$48.  If this fix breaks I would just recommend to buy the part, but at this moment, the fix is satisfactory.  My friend has saved some $$.


Sunday, May 25, 2014

Installing WDTV in 2007 Honda Odyssey


Introduction

I have 2007 Honda Odyssey EX-L with built-in entertainment system, so called DVD player.  For a long time, I kept a book of DVDs in the vehicle and I had to change the media whenever my kids wants me to.  To summarize the disadvantages of carrying DVDs are:
1. Big and heavy
2. Have to keep it up to date so the kids are not bored.
3. Distracting and unsafe when they ask me to change while driving.
4. Scratches make DVD unplayable or skip.

So I have decided to upgrade my minivan with media player.  I have used WDTV for a few years at home.  The advantage of this media player is that it has two USB ports.  I can attach USB thumb drive(s) to work as attached drive.
Figure 1. WDTV media player and Velcro to attach in the vehicle.

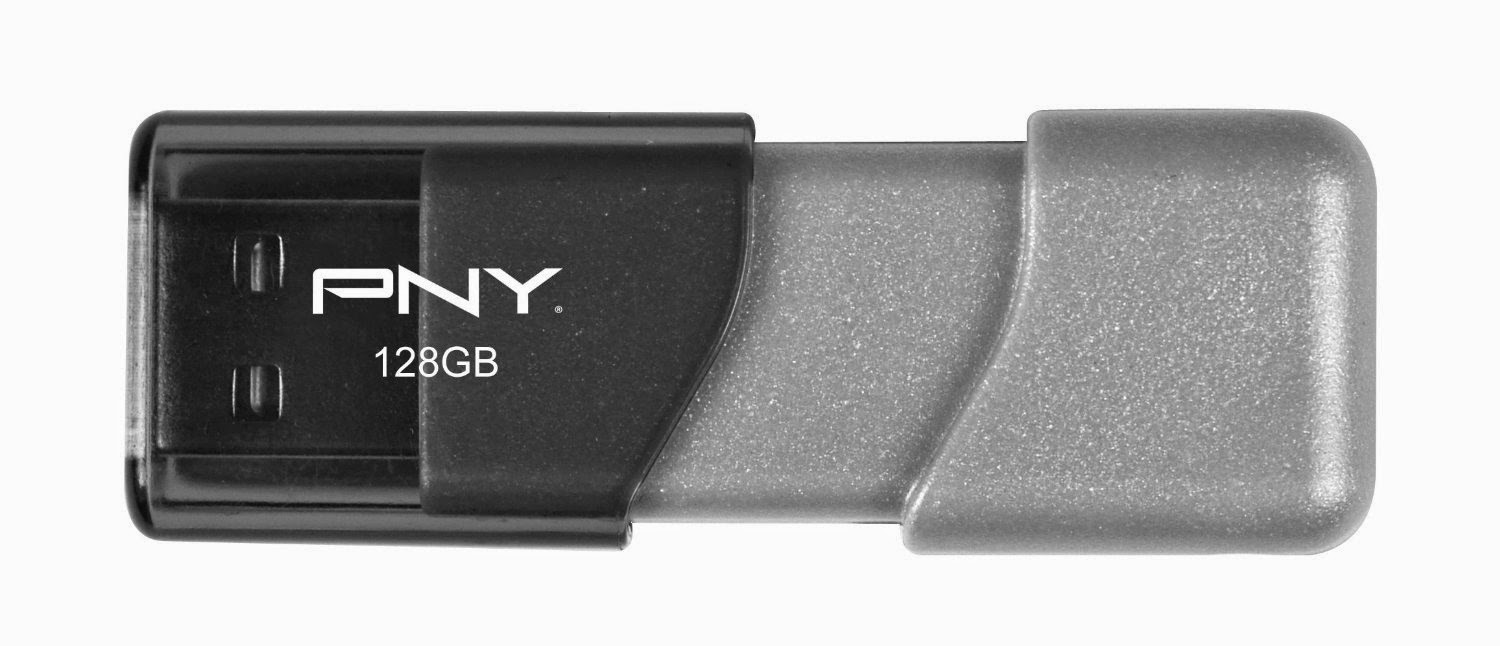
Although portable HDD (2.5 inch) gives much more storage option for the price(1 TB or more), it has moving parts and cable connection.  I decided to use 128 GB USB thumb drive since it would be good enough size for the vehicle (SD quality (480p)).  It also has no moving parts so it should last longer than HDD especially in the moving vehicle.  FYI, I have paid about $45 in Spring 2014.
Figure 2. PNY 128 GB USB thumb drive.  (Courtesy amazon.com)
Another good thing about WDTV is that it is one of very few media players these days with RCA input ports.  Most of new models only come with HDMI port which does not fit in my old minivan.


What I have

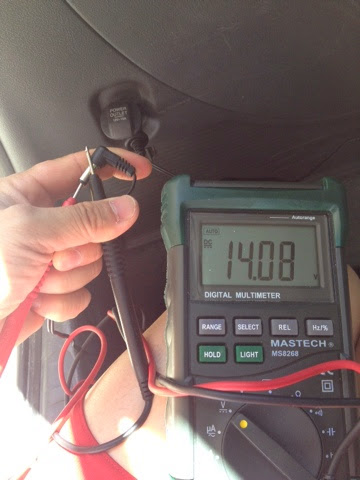
WDTV requires 12V DC adapter for home use.  In the Honda Odyssey, there is a 12V DC power jack in the trunk so I can use it directly without using a power inverter.    I could use the power from the front but I thought it would be better to have AUX and power comes from the same wall or direction to make wiring easier.
Figure 3. In  the trunk (driver side), there is a 12V DC power jack.
Also in the driver side rear seat, there is RCA input port taking Video, Left, and Right signals.
Figure 4. RCA jack located in the side globe box in the rear driver side seat.
Main difference between home and vehicle use of media player is the constant power to the device.  In home use, even though the user turns off the power of the device, the wall power still provides enough voltage to keep the metadata such as checking to see if the movie is previously viewed, if it had stopped in the middle, and so on.  So it can resume when the user turn the device back on.  In the vehicle, kids are annoyed if they have to watch the same first part of the movie whenever parents stops and restart the engine.  In order to prevent this issue, I took a 12V battery from my old home alarm system that I no longer use.

Figure 5. Small rechargeable 12V battery from old home alarm system.

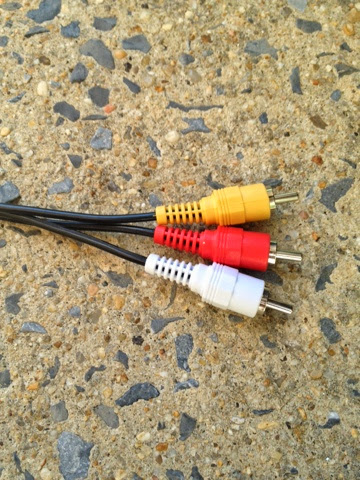
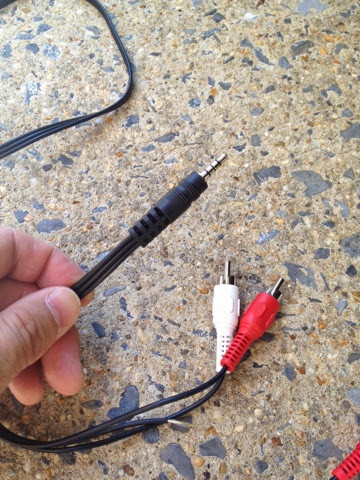
At least two cables should be attached to the WDTV to play a video: 12V power and AV.  AV comes from RCA ports but I only had two 6 feet cables.


Figure 6. RCA cable that needs to be cut and soldered.

What I did

Firstly, I need to find a good spot to keep the WDTV device.  WDTV's remote does not allow wide angle so it has to be in the center of the vehicle as much as possible so people in any seat can use the remote without trouble.  I decided the location would be under the center console between the driver and passenger seat.

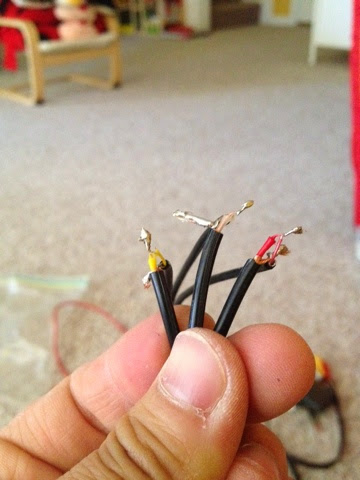
I had one RCA male-to-male connector so the AV port should be extended.  I cut one color on each cable and soldered carefully.
Figure 7. AV-RCA cable to be extended by soldering.
Figure 8. Soldered RCA cables.  This cable became >6 feet.

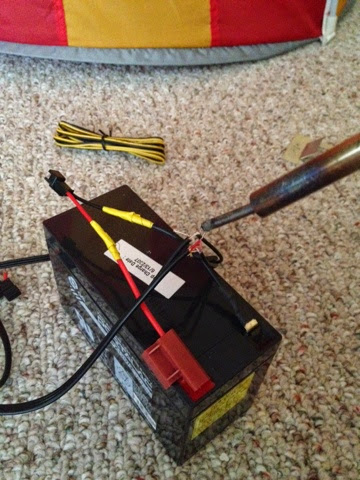
I took a connector from my broken electronics and soldered it to the battery so I can replace it without cutting the wire if I have to.

Figure 9. Battery connector is soldered.

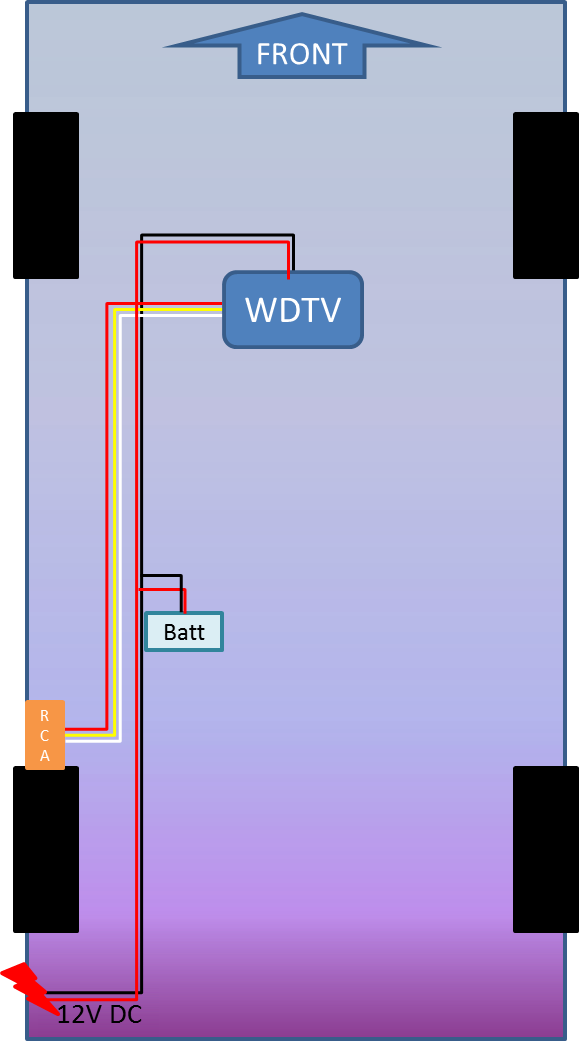
Figure 10 shows the sketch of the installation.  The battery goes underneath the middle seat and WDTV will be installed under the center console.  When engine runs, 12V battery will be charged and the power to the WDTV will not stop even after stop the engine.  In the WDTV option, there is a power saving option to turn off the media after 3 hours of no action.  I turned it on but I still wish the duration can be adjusted.
Figure 10. Schematic diagram of wiring.

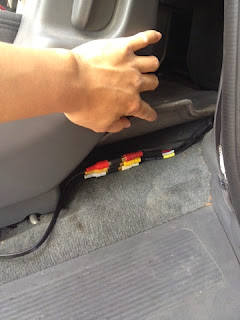
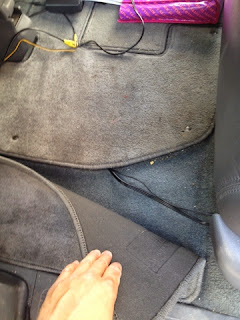
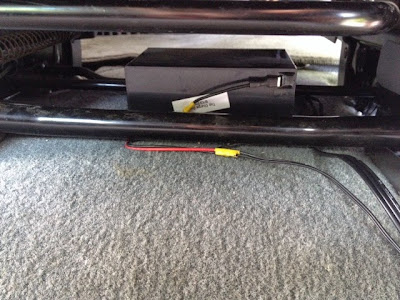
All the cables go underneath the carpet and the seats.  The battery is installed underneath the middle seat.  It is not only invisible but also protected by the direct Sun light when parked.

Figure 11. Cables underneath the carpet (middle seat)

Figure 12. Battery underneath the middle seat.  All the wires goes under the bars so it won't have issue when removing the middle seat.

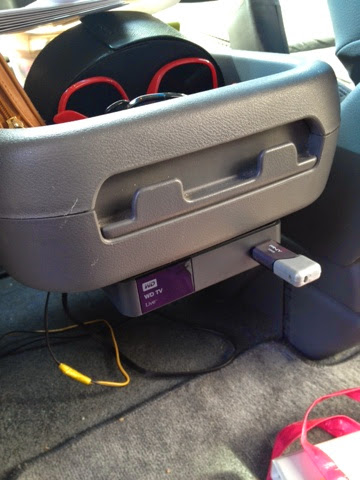
Figure 14 shows the WDTV using Velcro.  There is another USB port in the back so the capacity can be extended in the future.  Also I can bring many USB memory sticks so I can carry hundreds, thousands of movies/TV shows in just a few thumbs drives.


Figure 14. WDTV is attached under the console using the Velcro.    

Figure 15. Kids are enjoying Pokemon video using WDTV.